Background
The SEFSC-documentation-jekyll-skeleton repository is a template, or “skeleton”, starting point to create a new GitHub-based documentation site that uses the NOAA Fisheries Southeast Fisheries Science Center (SEFSC) documentation-theme-jekyll documentation format and functionality. This documentation theme is derived from the NOAA Integrated Ocean Observing System (IOOS) documentation-theme-jekyll and its upstream parent repositories, which is used for all https://ioos.github.io sites.
The instructions below will allow you to create a new GitHub Pages site that follows the look and feel/functionality of the Jekyll documentation theme used by the https://ioos.github.io site. You can then add/edit the template markdown documents with your own content.
The theme has many additional features that have are not demonstrated nor utilized in this preview repository. Check out the original documentation page provided by the theme author to learn more.
Getting Started
Follow Step 1a below if you do not yet have a GitHub repository and would like to start a new one with gh-pages. If you already have a repository to which you would like to add a new gh-pages branch with the SEFSC documentation template, start with Step 1b.
Step 1a: Use the SEFSC-documentation-jekyll-skeleton template to create your own forked repository
This is done on the GitHub website. These steps assume you already have a GitHub account in place.
-
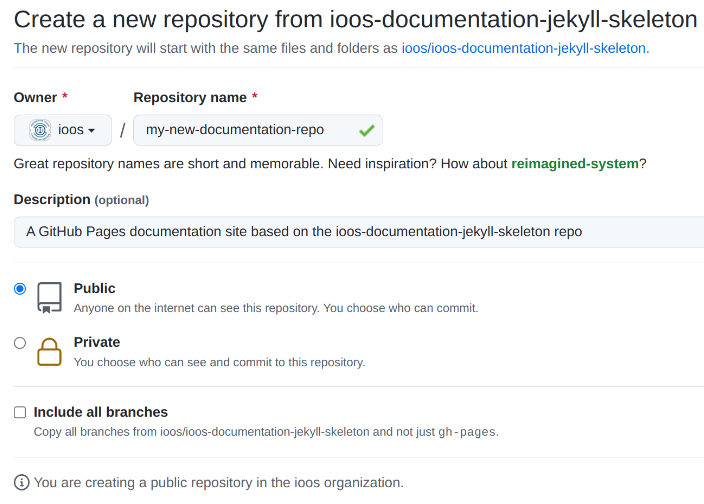
Browse to the SEFSC-documentation-jekyll-skeleton repository, select the “Use this template” button, and select “Create a new repository”:

-
Select the repository owner (your own account or a GitHub organization you have write permissions to) and type a name for the repository. If the new repository is for SEFSC-related work, the repository name should adhere to the SEFSC repository naming convention as depicted in the SEFSC GitHub SOP. Select other options as appropriate. At the end of this step, you should have a new repository available at the following URL: https://github.com/owner/my-new-documentation-repo.
-
From your new repository page, download or “clone” the repository to edit it locally using Jekyll/Ruby. The local editing process assumes you have a git client installed in order to push your edited files back to GitHub, and that you’re able to install the dependencies to run Jekyll (Ruby programming language). For those who do not have git, or cannot run Ruby, editing can be accomplished on the GitHub website one file at a time (see Step 2: Edit your documentation site content below for details).
Step 1b: Add a new orphan branch to the existing repository
An orphan branch in GitHub is a branch whose commit history is independent of all other branches in the repo. This is useful for gh-pages because we can keep the website files separate from any project code and can work on either the website or the project code independently from each other without GitHub wanting to merge changes across branches. GitHub Pages are customarily saved in branches named “gh-pages”.
-
Navigate to your local copy of the repository
-
Create a new orphan branch and remove the git commit history that is automatically generated.
git checkout --orphan gh-pages
git rm -rf .
rm .gitignore
Note: There may or may not be a.gitignorefile to delete. If not, do not worry. -
We need to temporarily set the remote origin to the SEFSC documentation repo. First, note the existing remote origin URL so that we can restore it later. It can be retieved with the command:
git remote -vThen change the remote URL to the documentation repo:
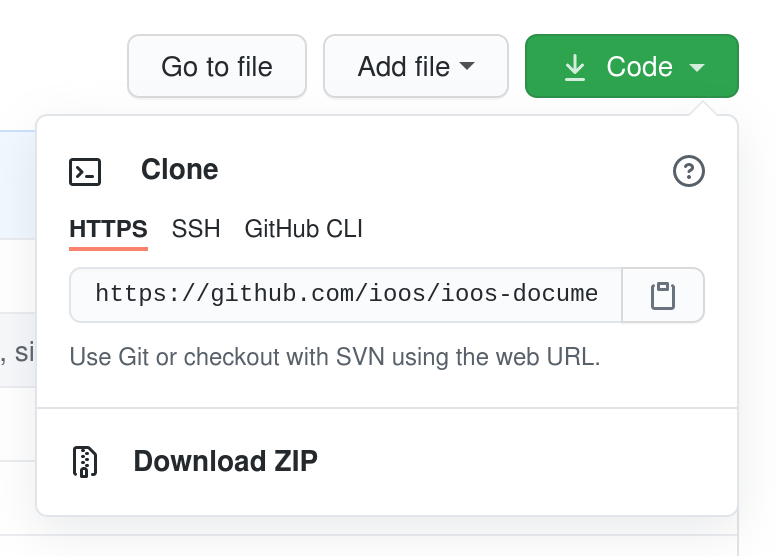
git remote set-url origin https://github.com/MattGrossi-NOAA/SEFSC-documentation-jekyll-skeleton.gitNote: To find this new URL, navigate to the SEFSC-documentation-jekyll-skeleton repo in a web browser and click on the green “< > Code” button. -
Make sure you’re on your local gh-pages branch and then pull the contents of the gh-pages branch of SEFSC-documentation-jekyll-skeleton repo
git checkout gh-pages
git pull origin gh-pages
Use
ls -lato verify that you now have all of the files and directories from the skeleton repo. -
Change the local remote origin back to the original repo
git remote set-url origin <old-url>where <old-url> is the URL of the original repo retrieved in Step 1b.3.
-
Push this new branch to the remote repo
git push origin gh-pages -
In a web browser, navigate to the repo to which you just added a gh-pages branch. Click the “Settings” tab, then “Pages” on left sidebar.
-
In the “Build and deployment” section, under “Source”, select “Deploy from branch” from the dropdown menu.
Note: If your repo belongs to you (as opposed to belonging to an organization), it must be a public repo for this be available. -
Under “Branch”, select “gh-pages” from the dropdown menu. Leave the directory as “/(root)” and click “Save”.
-
While still within “Settings”, click “Actions” on the left sidebar, then “General”.
-
Under “Workflow permissions”, select “Read and write permissions” to allow GitHub Actions to modify the repository, then click “Save”.
-
At the top of this page, you should see a banner saying “Your site is now live at…” with the URL of your documentation page. Launch the page to be sure. It should look exactly like the SEFSC-documentation-jekyll-skeleton page but with a URL pointing to your project.
You should now have at least two local branches: the gh-pages branch you just created, and whatever branch(es) you had originally (e.g., main, master, etc.). Verify using git branch --all. Likewise, your remote repository should now have a new gh-pages branch as well as the original branches, and it should contain a copy of the SEFSC documentation template files and subdirectories.
Use git checkout <branch-name> to switch between branches. Everything that follows involves this new gh-pages branch.
Step 2: Setting up your site for editing
Editing content in your new fork of the documentation skeleton repository can be done in one of two ways:
- Locally using a text editor and optionally running in local development mode via a Ruby/Jekyll installation, or
- Online using the GitHub website
Editing locally with Ruby/Jekyll is easier for making major changes to the site, including more complex changes to theme content, such as configuring the sidebar navigation, working with images in the /_docs/images/ folder, etc. It requires a basic text editor for editing theme content, a local installation of Ruby/Jekyll to preview your changes, and git client to push your changes back to GitHub. See the Editing locally with Ruby/Jekyll section for details.
Editing in GitHub is easier for more minor content modifications such as editing text in individual markdowns file, one at a time. See the Editing online in GitHub section for details.
Editing locally with Ruby/Jekyll
This approach allows instantaneous rendering of the site exactly as it will appear in GitHub Pages so you can more rapidly iterate changes. Once you are happy with your changes, you can then commit them to your git branch locally, and push them with git to GitHub to update the online GitHub Pages site (or follow the GitHub PR workflow, if you prefer). Using git is outside the scope of this HOWTO, but lots of documentation and tutorial are available onine to learn git.
Setting up the Ruby/Jekyll environment:
Instructions are available in the Jekyll Documentation Theme Getting Started documentation. This is the upstream Jekyll theme that the SEFSC documentation theme is based on.
Follow these steps first to get your Jekyll environment running. In particular, use the Option 2: Build theme with github-pages gem approach to run the site, or read on to the section below.
Running the site in Jekyll:
Some modifications to the theme have been made for the SEFSC’s purposes. Therefore, instead of using the exact bundle commands included in the Jekyll Documentation Theme instructions to run the site, use the following instead to run Jekyll via Bundler in incremental build and verbose logging mode (using the _config_dev.yml for local development settings):
bundle exec jekyll serve --config _config.yml,_config_dev.yml --watch --verbose --incremental
If changing headers and menus, stop the running server by entering ctrl-c in the terminal. Then, clean up the locally-built site (in the _site directory) and re-run:
bundle exec jekyll clean
bundle exec jekyll serve --config _config.yml,_config_dev.yml --watch --verbose --incremental
By default, the bundle exec jekyll serve command will serve the site on your machine at:
http://localhost:4000/SEFSC-documentation-jekyll-skeleton/
Once you have the site running, you will want to modify the settings found in the _config.yml and _config_dev.yml files to change the site URL from “SEFSC-documentation-jekyll-skeleton” to a URL of your choosing, and make other modifications as appropriate.
See the Editing and configuring your documtenation site section for futher explanation of these and other important theme files to familiarize yourself with and modify as appropriate.
Editing online in GitHub
When you are setting up a new documentation site initially, you will likely want to use the Ruby/Jekyll approach described above to get your site configured. Once this has been accomplished and your site is running in GitHub Pages, you can make minor edits to your site directly on GitHub with your browser in three simple steps:
- Go to the page you want to edit, and click on the “Edit me” button just below the page Title and Summary;
- Open it for editing by clicking on the “pencil” icon at the right side above the file content;
- Make all changes, preview them to make sure that everything is okay, and commit them to the “gh-pages” (make sure that the “Commit directly to the gh-pages branch” option is checked).
A visual walkthrough of this process is also available in the Editing Markdown Files for GitHub Pages Google Slides presentation.
Editing and configuring your documentation site
The table below lists important theme configuration files, which will require editing and customization for newly-created sites, and important directories in which to place content for your site.
| Name | Description |
|---|---|
_config.yml |
Main Jekyll configuration file. Modify settings here to change anything related to the theme. The important settings to update are primarily located at the top of the file and include settings like: “title”, “name”, “description”, “baseurl”, among others. More documentation can be found in the “Documentation Theme for Jekyll” original documentation (see below). |
_config_dev.yml |
Settings for running the site locally via Ruby/Jekyll in development mode. You should only need to modify the baseurl setting for your documentation site to align with that of _config.yml. |
/_data/sidebars/sidebar_sefsc.yml |
Configuration file for a side accordion navigation menu. Further description of the configuration details and how they work is beyond the scope here; refer to the Jekyll and the “Documentation Theme for Jekyll” original documentation for more info. |
/_docs/ |
Directory to place any GitHub-standard markdown (.md) content to publish. |
/_docs/index.md |
The markdown file that contains the content for the “homepage” (index.html) for the site. This should be updated/replaced accordingly. |
/_docs/images/ |
A folder to add any image content to reference in your documentation pages. |
Configuring the side navigation bar
The sidebar navigation adapts to the documentation. Although the theme allows the use of several sidebars (see _config.yml file), a single sidebar “sefsc_sidebar” is used by default for the SEFSC implementation. The sidebar name must be specified either in the “defaults” section of _config.yml (as it is in this skeleton repo), or it may be configured on a page-by-page basis in the page’s frontmatter. Here’s an example of the page frontmatter showing the sidebar property:
---
title: Alerts
tags: [formatting]
keywords: notes, tips, cautions, warnings, admonitions
last_updated: July 3, 2016
summary: "You can insert notes, tips, warnings, and important alerts in your content. These notes are stored as shortcodes made available through the linksrefs.html include."
sidebar: sefsc_sidebar
permalink: mydoc_alerts
---
The sidebar: sefsc_sidebar refers to the _data/sidebars/sefsc_sidebar.yml file. The sidebar data file uses a specific YAML syntax that must be followed. Follow the sample pattern shown in the theme, especially looking at sefsc_sidebar.yml as an example.
The side navigation bar in this template points to three different files:
- index.html
- howto.html
- about.html
These html files are automatically generated from the corresponding Markdown files in _docs/, which contains the page content, when the website is compiled. The second and third files contain the instructions and technical overview, respectively. Neither are necessary for a documentation page. These files can be repurposed and renamed, if desired, or deleted. Just be sure to update _data/sidebars/sefsc_sidebar.yml accordingly.
For more details on the sidebar syntax, see Sidebar navigation.
Editing markdown documents
This theme uses a Kramdown variety of Markdown, a lightweight markup language with a plain text formatting syntax. Kramdown is a superset of Markdown that supports standard Markdown and various extensions. GitHub Pages naturally support rendering documents in Kramdown through GitHub Jekyll implementation. A detailed description of Kramdown syntax can be found by following the links in the Reference section below.
Every document must start with the so-called frontmatter properties (order does not matter):
---
title: "Some title"
keywords: keyword1, keyword2, keyword3
tags: [sample1, sample2]
last_updated: Month day, year
sidebar: sidebarname
topnav: topnavname
toc: false
#search: exclude
#permalink: filename.html
editme: true
summary: "optional summary here"
---
For titles, surrounding the title in quotes is optional, but if you have a colon in the title, you must surround the title with quotation marks. If you have a quotation mark inside the title, escape it first with a backlash \.
Values for keywords get populated into the metadata of the page for search engine optimization (SEO).
Values for tags must be defined in your _data/tags.yml list. You also need a corresponding tag file inside the tags folder that follows the same pattern as the other tag files shown in the tags folder. (Jekyll won’t auto-create these tag files.)
The value for search controls the inclusion of the document content into the theme search mechanism. If you want to be able to perform basic search through your site documents, make sure that this “exclude” property is commented out in the frontmatter.
In the current version of the theme, the permalink property value interferes with other collection settings; therefore it should be commented out (using a hash, #) in the frontmatter. However, it should not be removed as it may be needed in future versions.
Follow the sample pattern shown in the theme, specifically looking at the Markdown sample documents in the _docs folder as examples.
When finished editing a particular markdown page, set editme: false in the frontmatter properties to hide the “Edit me” button at the top of the page.
A note on submodules
This theme uses two GitHub submodules. Submodules are essentially links to other GitHub repositories that allow certain components of the site to be synchronized more easily across all SEFSC GitHub Documentation sites. For example, the menu bar at the top of the page is configured with a single YAML file in a submodule, and the theme code itself, including site functionality and look and feel, is kept within a second submodule.
The git submodules for this skeleton repository are sourced from the MattGrossi-NOAA/documentation-theme-jekyll repository and located in the following submodule paths (as configured in the .gitmodules file in the repository root):
| Submodule Path | Branch Name | Description |
|---|---|---|
/_data/navbars/ |
navbars | YAML configuration file for the SEFSC top navigation bar (topnav_sefsc.yml) |
/theme/ |
main | Jekyll theme files containing the look and feel and functionality of the site |
Updating submodules in a local development clone
If you’re doing local development with git and Jekyll and your local working copy is out of date (some number of commits behind the GitHub-hosted source repository), the workflow to follow to update your local working copy is slightly more complicated due to the presence of the submodules.
First, follow a typical git process to pull in the remote changes from GitHub. Assuming origin is the git remote repo alias and gh-pages is the working branch, run either of the following commands to update your working copy:
git pull
or
git fetch origin
git merge origin/gh-pages
At this point, running a git status command may indicate that your working copy contains commits on the submodules that differ from the remote repo you’re working with. This looks something like the following:
git status
On branch gh-pages
Your branch is up-to-date with "origin/gh-pages".
Changes not staged for commit:
  (use "git add <file>..." to update what will be committed)
  (use "git checkout -- <file>..." to discard changes in working directory)

        modified:   _data/navbars (new commits)
        modified:   theme (new commits)
This means you must also update the submodules to match the commit recorded in the latest commit of the superproject (i.e. the documentation repo itself). Pull in any upstream changes to submodules by running either of the following (--init and --force --remote may be needed in some circumstances):
git submodule update --init --force --remote
git submodule update --init
git submodule update
You can confirm the submodules are configured correctly to track the upstream repository branches (and not tagged to a specific commit) by running:
git submodule status
This should output something like the following, showing the hash of the commit currently checked out, the submodule name, and the remote branch tracked:
edb2048843b71191909d53428b969f53bfbe4757 _data/navbars (remotes/origin/navbars)
d958aec9981aacace8c08dc6b2da147afdab9af6 theme (remotes/origin/main)
Additionally, running git status again should resolve the modified status of both submodule paths (meaning your working copy is now fully in-sync with the latest remote commit on GitHub) and you can now commit new changes without affecting the submodule commit history:
git status
On branch gh-pages
Your branch is up-to-date with "origin/gh-pages".
nothing to commit, working directory clean
Working with submodules can be tricky; however, the steps above should work in most cases. For full documentation on the git submodule command, see: https://git-scm.com/docs/git-submodule.
There should not be any need to modify code in either of the submodules manually; they are meant to be identical across all of the individual SEFSC GitHub Documentation sites. They need only to be properly updated in local working copies before submitting any changes back to GitHub. Both submodules are also automatically synchronized in GitHub with changes in the source MattGrossi-NOAA/documentation-theme-jekyll repository via GitHub Actions as configured in the .github/workflows/sync_theme.yml file. For the MattGrossi-NOAA/SEFSC-documentation-jekyll-skeleton repository, that file can be found here.
References
- Original Documentation for the Documentation Theme for Jekyll
- A Comprehensive Guide for Jekyll
- Ruby documentation & downloads
- General information on the way GitHub uses Jekyll in “GitHub Pages” sites
- GitHub Kramdown:
FAQ
1. Why is the theme not rendering properly when deployed to the web?
If the page looks something like:

- Check that
_config.ymland_config_dev.ymlare pointing to the right repository. This can happen if URLs are incorrect. See this pull request as an example.